How to Defer Payments and Interest to give your Borrowers some Breathing Room Because of the COVID 19 Pandemic

Q: How can I provide my borrowers a temporary payment and interest break in Margill Loan Manager?

A: With normal loans, those with regular payments, at regular intervals, and no regular fees or taxes (the case with leases), this can easily be done in Margill and in bulk. So you need not do this individually, loan by loan unless you are dealing with irregular scenarios where these would have to be done partially in bulk and on an individual basis in many instances.

In the latest version 5.1 (released March 20 or 23, 2020) we created a tool to specifically allow the interest rate to be changed to 0.00% or reduced by x% for a determined period of time.

NOTE: If you do not wish to give borrowers a break with the interest rate, skip step 1. The interest rate will remain unchanged and accrued interest will be compounded if you are charging Compound interest. If you are using Simple interest you can also capitalize that interest with the right mouse click on the last line with payment of 0.00 :

Steps:

  1. Change interest rate to 0.00% (or other rate)
  2.  In the “Post Payment” tool, export the payments to be “cancelled” (deferred)
  3. Post payments to 0.00 (or other amount) in the “Post Payment” tool
  4. Add new (deferred) payments at end of loan


1. Change interest rate to 0.00% (or other rate)

Let’s do an example:

Normal payment schedule before the 0.00% interest for 3 months:
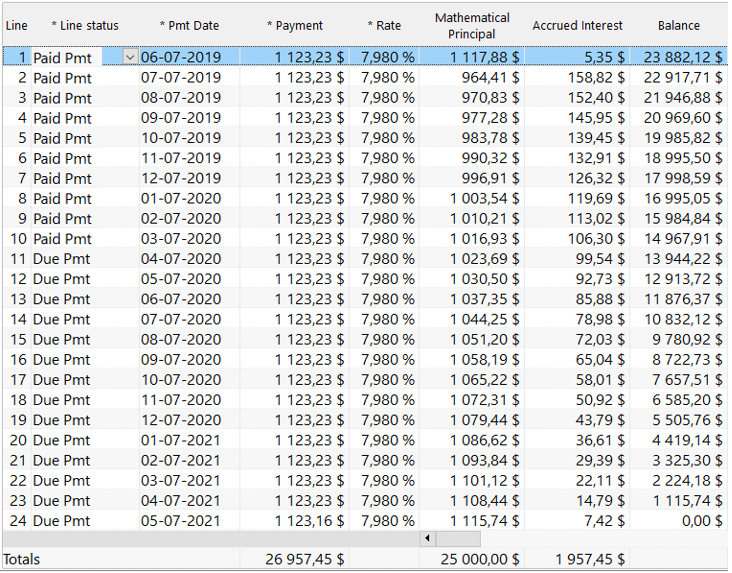
We wish to stop charging interest for the months of April, May and June for the loans highlighted in blue below.

In the Main Margill window, select (highlight) the desired loans. This shortcut must then be used: “Ctrl Alt Shift i”. This window will appear with a new option “Add End date of rate change”. In normal situations this is kind of difficult to understand since a little illogical… We will probably delete this option in version 5.2…

Enter as such:
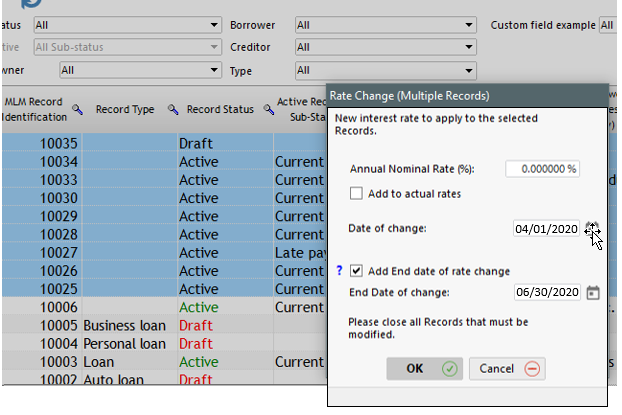
You will be prompted to do a backup – PLEASE do this just in case you enter the wrong dates – you don’t want to have to change back your interest rate loan by loan!

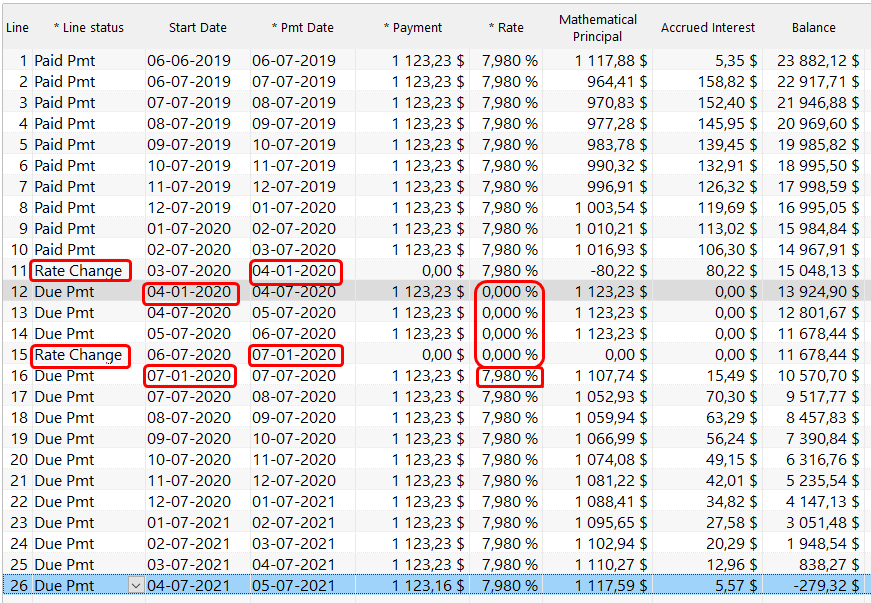
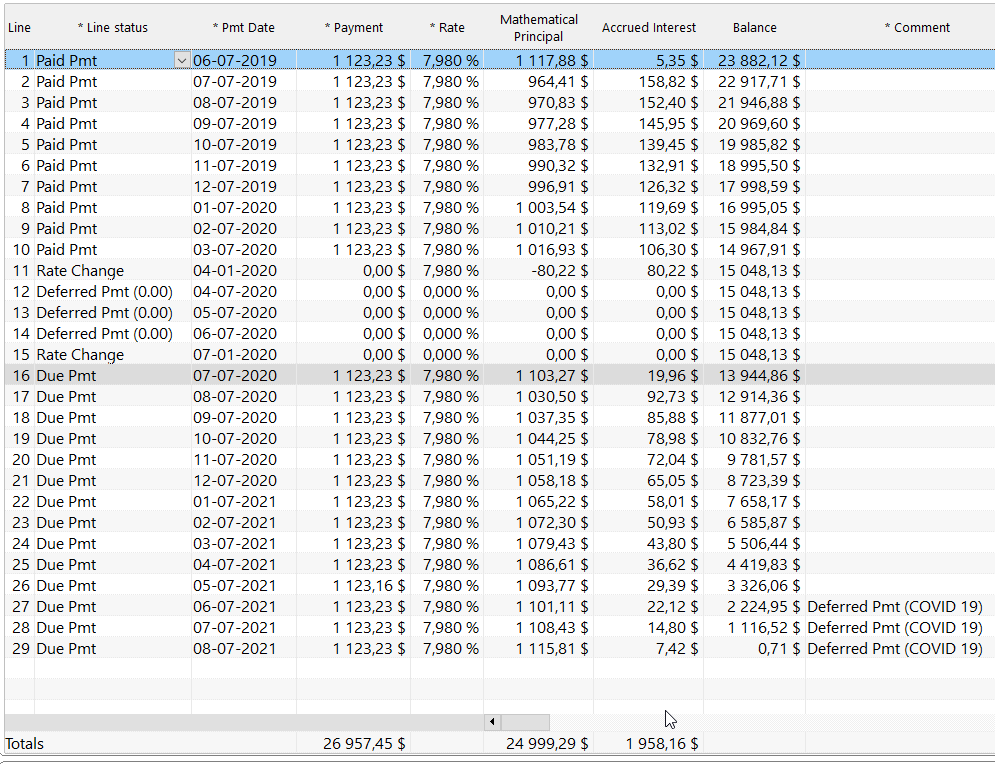
In the example, notice two new lines with Rate change. So rate of 0% as of 04-01-2020 and back to 7.98% on 07-01-2020 (we temporarily displayed the “Start Date” column which is normally hidden):

2. In the Post Payment tool, export the payments to be cancelled 

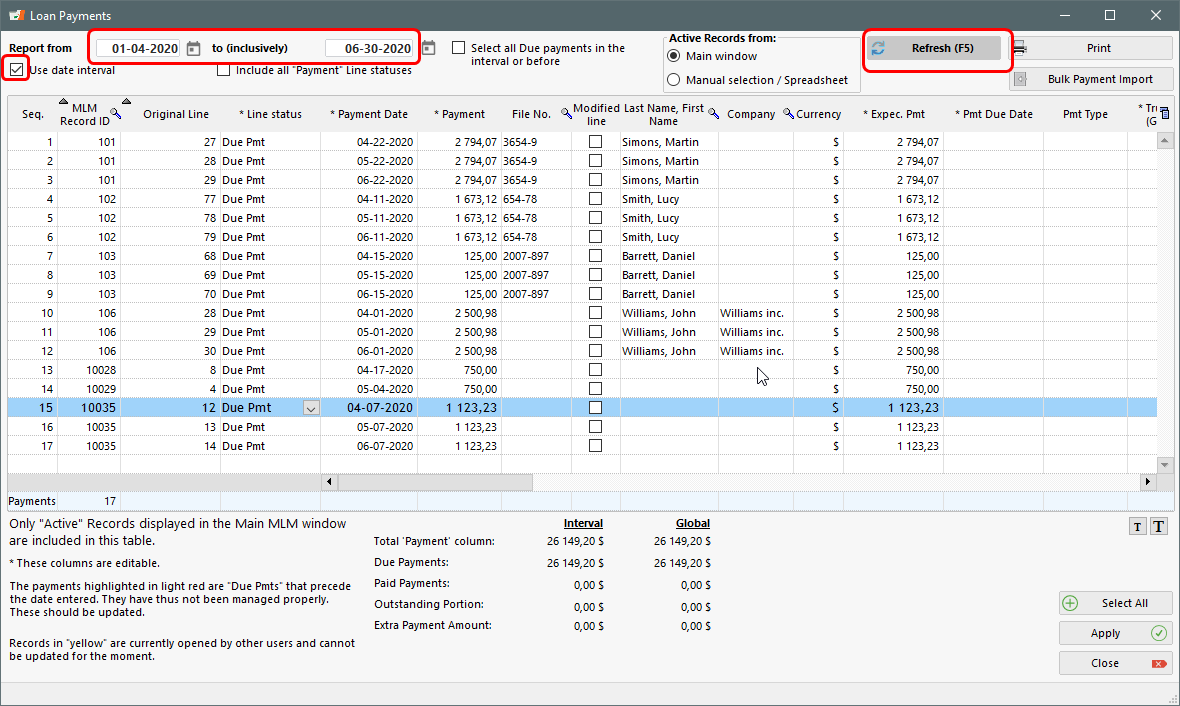
We first wish to find all payments to be deferred. Go to Tools > Post Payments (a very powerful tool!), check the box called “Use date interval” and enter the proper dates to find all such payments. Press on Refresh.

These are all the payments we wish to defer (so a total amount of 26,149.20 in this scenario -“Interval” amount):
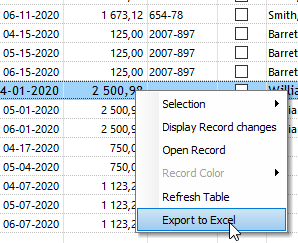
Right click in the window and “Export to Excel” – save the file which we will be using in step 4 to re-import the deferred payments.

3. Post payments to 0.00 (or other amount) in the “Post Payment” tool

Stay in the “Post Payment” tool with the current list of payments. Right click with the mouse and choose this option:
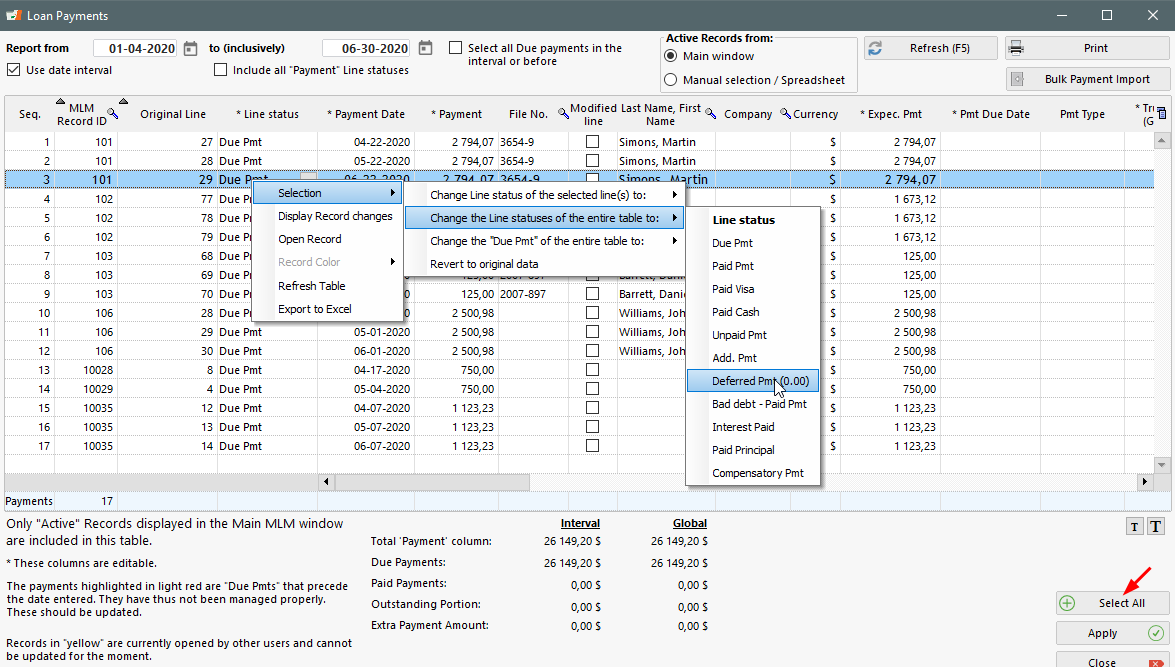
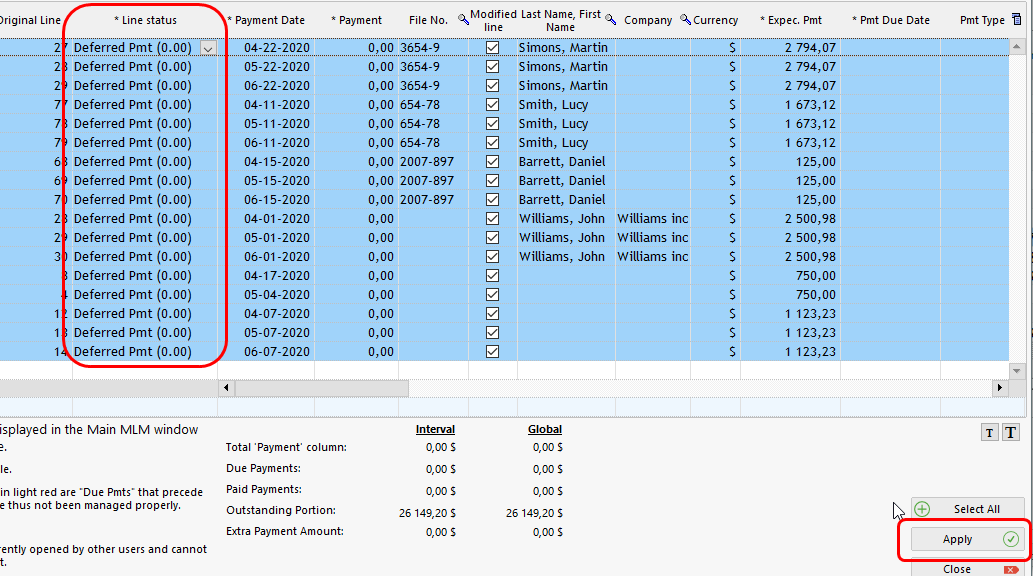
You also could have clicked the “Select All” button and the option to change the Line statuses would have been there as with the right mouse click.

Notice the special Line status that was created: “Deferred Pmt (0.00)”. This would have been created previously through Tools > Settings > System Settings (Administrators) > Line Payment statuses (this is a “No payment” type Line status that must be = 0.00):
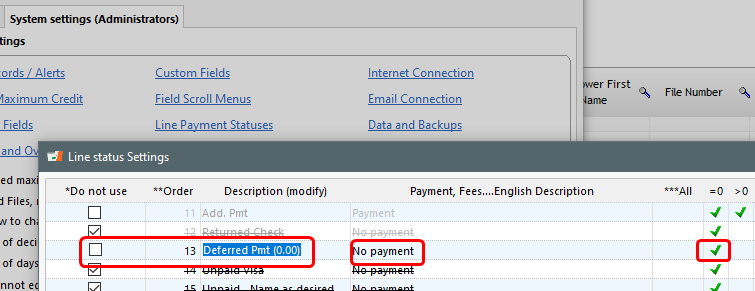
No Automatic fees will apply to this Line status – contrary to the usual “Unpaid Pmt” Line status if such a fees rule had been activated.
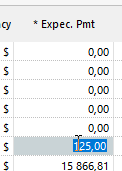
NOTE: If you are monitoring the Outstanding amounts, you should change the “Expect. Pmt” column amounts to 0.00 for each payment, otherwise these amounts will become outstanding. A slight pain to do one by one if you have hundreds or thousands of loans! As of version 5.2 you can specify that the “Expected Pmt” for specific Line statuses must = 0.00. This will save a huge amount of time since the “Expect. Pmt” will automatically become 0.00 (go to Tools > Settings > Line payment statuses > check the “Expected Pmt = 0” column for the “Deferred Pmt (0.00)” (or named as you wish) Line status).

If you do not do this in version 5.2, then double click in each cell and delete:
 

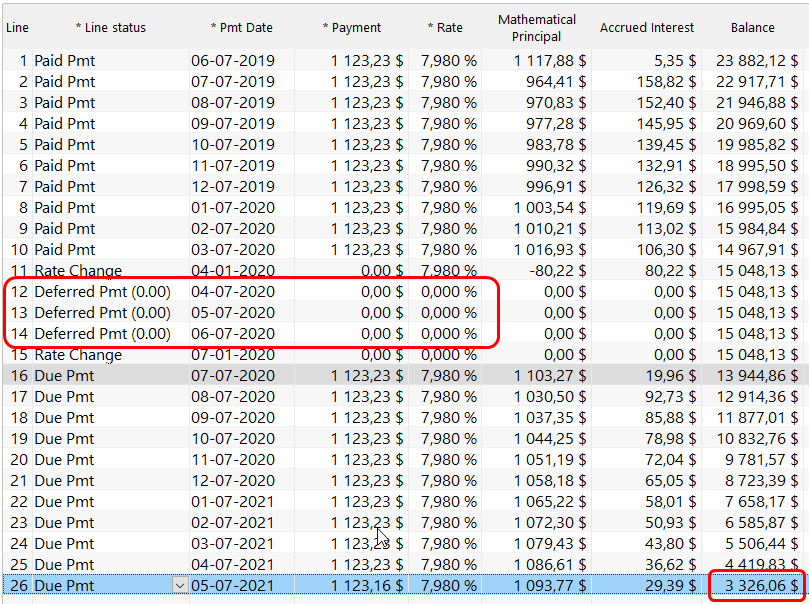
Now press on “Apply”. The window will become blank after the payment processing stating the number of Records updated. They are now managed and payments 0.00. In our example, notice now an ending balance because of the three deferred payments:

4. Add new (deferred) payments at end of loan

Adding the deferred payments at the end of the loan is the more arduous step because of the date issues.

To import the payments back into Margill, we will be using the “Post Payment” tool once again but with the “Bulk Payment Import” option that allows us to import new payments via an Excel sheet.
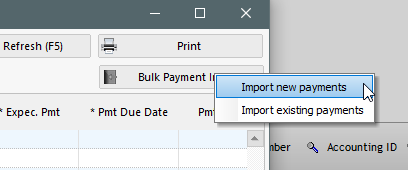
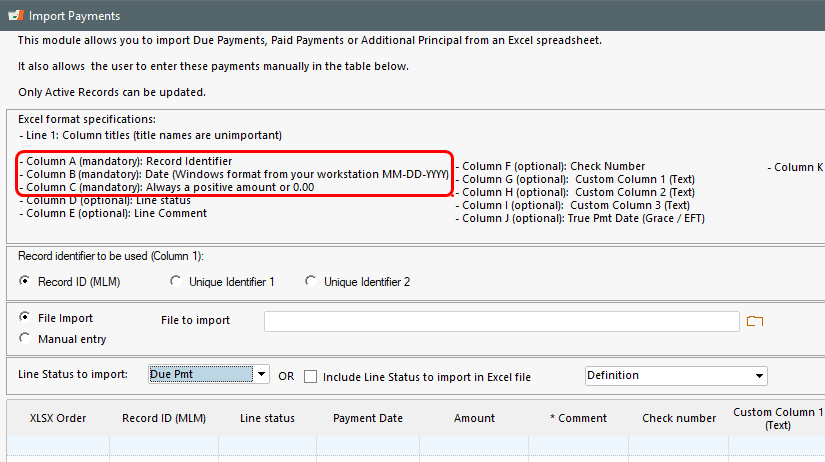
All we need to import the deferred payments back to each loan individually are 3 columns (and other optional ones):

  • Column A – the Record identifier
  • Column B – the date of the deferred payment
  • Column C – the amount of the deferred payment
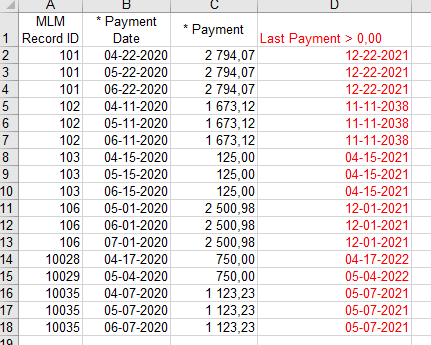
We will now modify our Excel sheet. We can delete most columns and keep the three important ones even if the Payment dates are the payment dates of the original payments to be deferred. Notice a column to the far right called “Last Payment > 0,00” – keep this column in order to know the very last line of the schedule (with a payment greater than 0.00) as a reference to add the next payment date (I moved and changed to red since will be temporary):
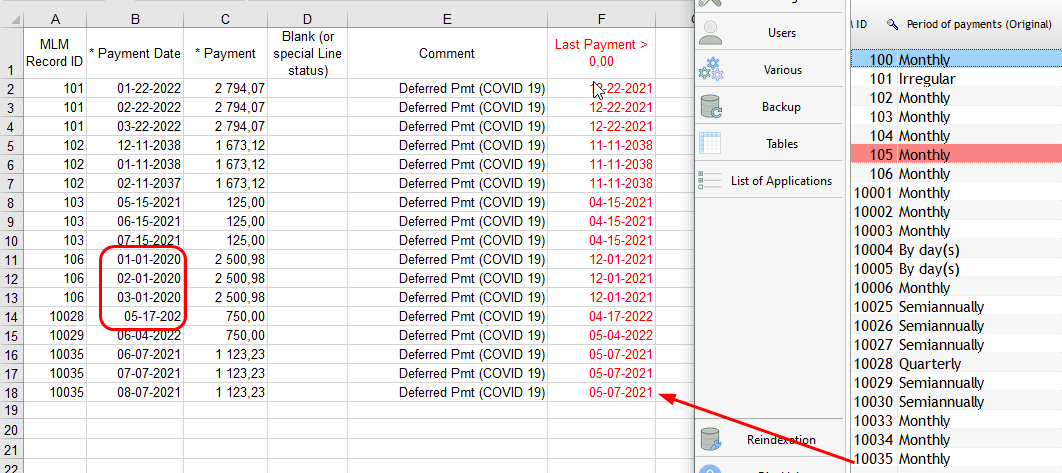
In our sample loan 10035, the last payment would have been on 05-07-2021 so I added my first deferred payment one month after and added another month for each of the next two payments. Someone who’s good in Excel can probably create some way to get the dates in there quicker by using the EDATE function (see how to months below) or, for weekly payments by adding 7, 14, 21 days to the Last payment date.

To see the payment frequency (although one can tell by the original payment date sequence) I showed the Period of payments in my Main Margill window.
 

==================================================================

Using the EDATE function in Excel

If you have a relatively large number of payments to add at the end of each of the loans,
it is really worth using the EDATE function which allows you to quickly add
one or more months at the end of the payment schedule

Loan 101 below ends on 12-22-2021. We must therefore add a month after this date, hence the formula:
=EDATE(B2; 1) where B2 is the cell and 1 is + 1 month

Then we must add 2 months for the second to last payment
=EDATE(B3; 2) 2 being + 2 months

Finally add 3 months for the new last payment
=EDATE(B4; 3) 3 being + 3 months

Column F is not relevant – only used to show the number of months that need to be added
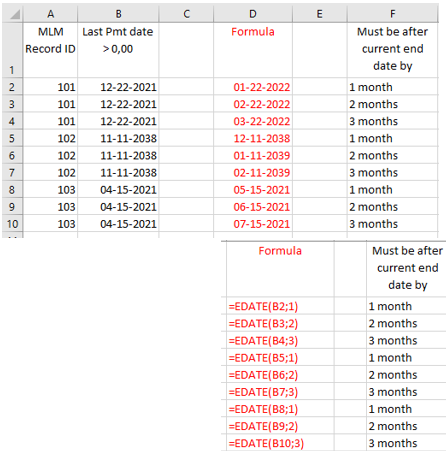
The formulas can then be copied for each of the “trios”. BE CAREFUL to always have
1, 2, 3 and not 5, 6, 7, 8, etc. in the subsequent formulas for adding months.

Once the 3 new dates are all calculated, simply copy
the “Formula” column and “Paste Special” > “Values” to column B

==================================================================

My Excel file is now clean and ready for import. Notice I added a Comment in column E and column F should be taken out.

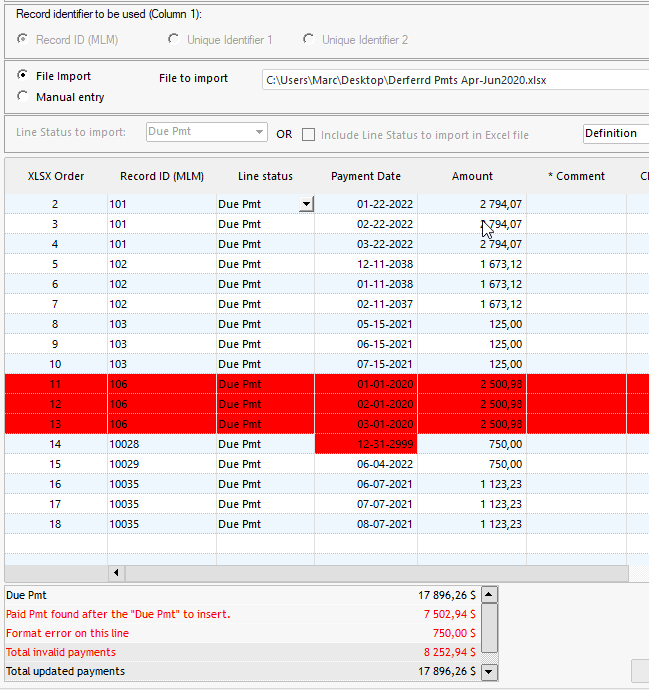
I also purposely made an error in Record 106 – entered 2020 instead of 2022… There’s also a date error in Record 10028.

Now go to Tools > Post Payment tool > Bulk Payment Import > Import New Payments. Select the Excel file in the “File to import” section.  Use this button .

You will see a list of all the new deferred payments and dates.

Notice Record 106 shows as an error since these are “Due payments” in the past and before “Paid payments” which is not allowed. Record 10028 date should also be fixed.
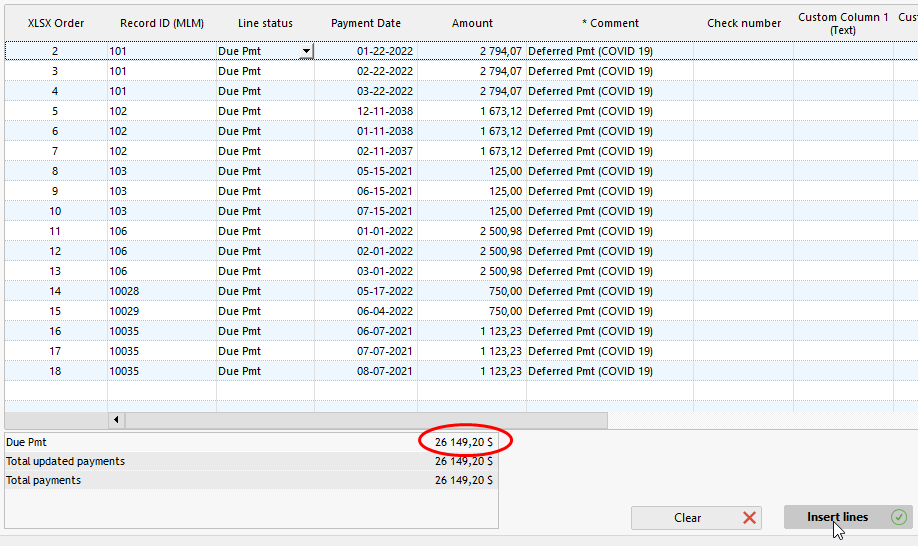
Fixes done in Excel sheet. Re-import. Notice the total amount desired (26,149.20) is re-imported. Press on “Insert lines”.
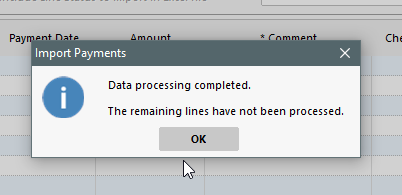
If all good, we get this message:
Let’s look at our sample loan with lines 27-29 now added. Notice a difference of 0.71 (the balance). This is probably due to the interest rate change at the start and end of month as opposed to the exact payment date on the 7th. You could adjust the last payment but no big deal (check then uncheck Balance = 0.00)
So there you have it. You gave your clients a break…. Many may need it because of the pandemic.

Please stay safe!

Marc Gelinas, CEO

NOTES:

As of version 5.2 Column fees (such as monthly fees or taxes) can also be re-imported with the bulk payment import via Excel but as amounts only (not as formulas). These can be entered in columns S, T, U and V.

Is there an Alert that we can add that will pop up when we attempt to add more principal than what we have set as the maximum credit?

Q:  Is there an Alert that we can add that will pop up when we attempt to add more principal than what we have set as the maximum credit?

A: Yes, this is called a Conditional Alert.

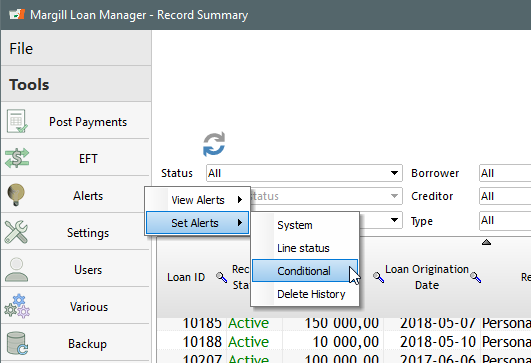
In the Main window go to Tools > Settings > Set Alerts > Conditional:

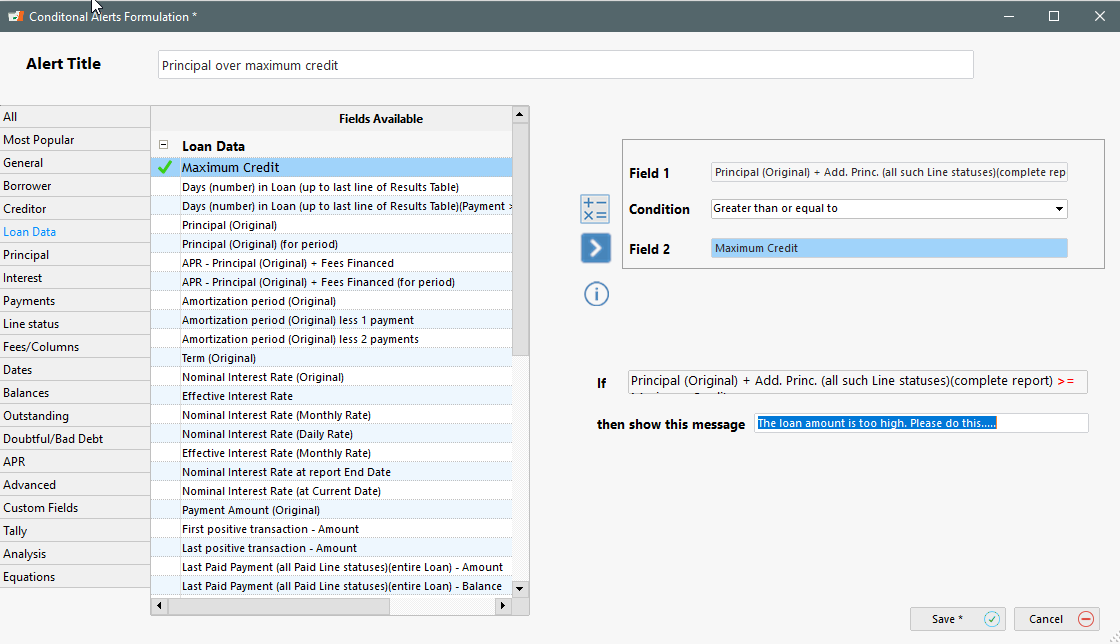
When the window opens, click on “New” and the window below will appear allowing you to name the Alert and its condition.

Your condition is quite simple: warn the user when Initial Principal + any additional Principal (as a Line status) added is greater that the amount entered in the Maximum Credit field. Go to the themes on the left to get the proper fields.

You then enter the message that should be displayed to the user when this condition is met.

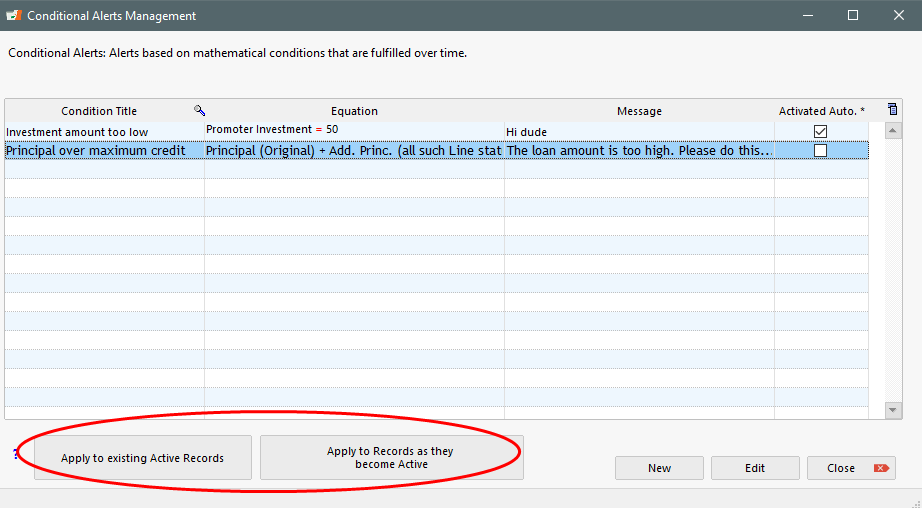
Save the Alert and you will get back to the list of Conditional Alerts page. Highlight the newly created Alert (the one in blue) and press on both buttons: Apply to existing Active Records and the Apply to Records as they become Active.

You could also use Custom fields for extra criteria and even Equations to, for example, “add these 4 fields” that must be less than this other field.


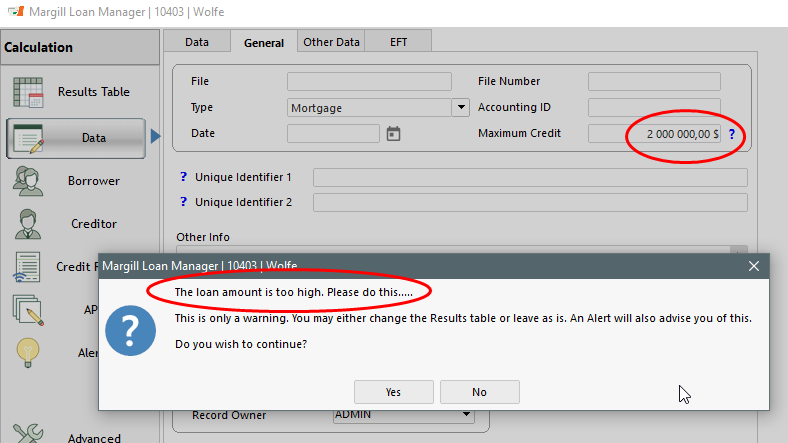
Now, in this example, we have Credit limit of 2 million and the user tried adding another million to the existing 1.5 million and got this warning when saving…

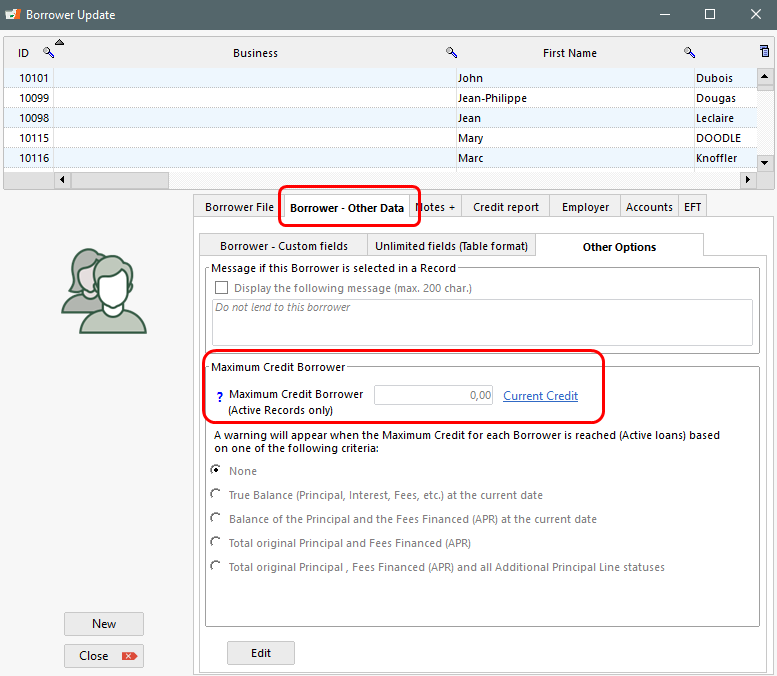
Another maximum credit tool allows you to set a maximum by Borrower – this is useful if a Borrower has multiple loans in the portfolio:


Mass data entry / Global database changes / Adding new data in the database in bulk / Mass database changes in Margill Loan Manager

Q:  We have added some custom fields for additional loan information.  Is there a way we can mass import only those specific custom fields in Loan Manager?

A: Yes you can mass import data into Margill Loan Manager. This is with what we call “Global changes”.

This can be done for the loan, mortgage, line of credit, lease, etc. (the Record) or for the Borrower.

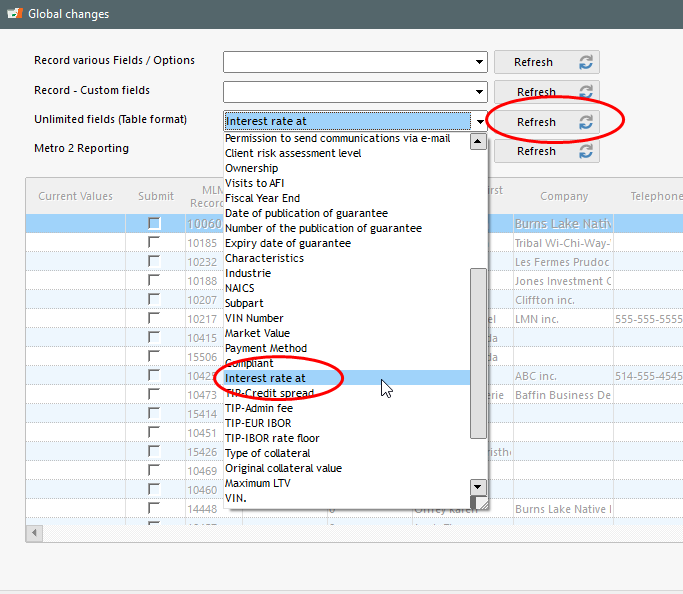
For adding new information or changing data in many Records at once, sort these in the Main window, choose the desired Records, highlight these and right click with the mouse. Choose Global changes:

This window will appear showing the various fields that can be changed.

There are over 30 fields that can be changed plus all Custom fields.

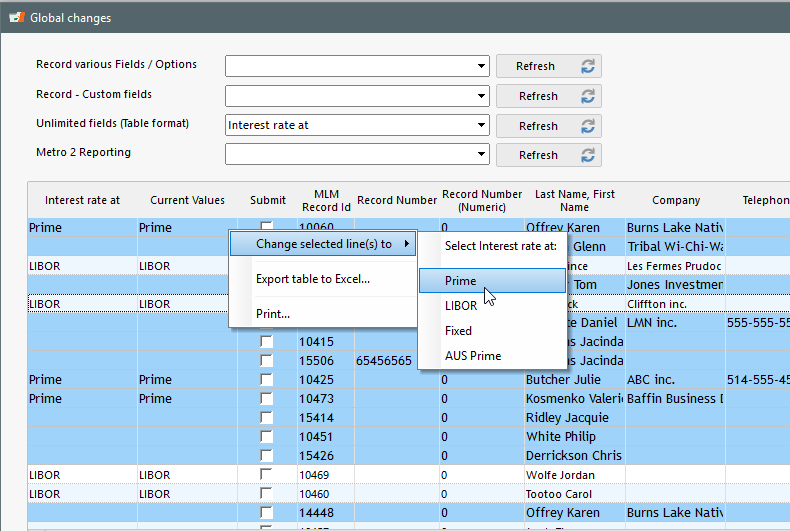
Select the field you wish to add data to (or change data) and press on Refresh. You can only add data to one field at a time.

Your can then highlight the Records and with the right mouse click add/change the data in bulk. Case being, you will see existing data and can replace these or not. Use the Ctrl or Shift key and mouse to pick and choose the desired lines.

Below is the option when a scroll menu exists for the Custom field. If the field was a Text field for example, you would simply enter any text (no menu).

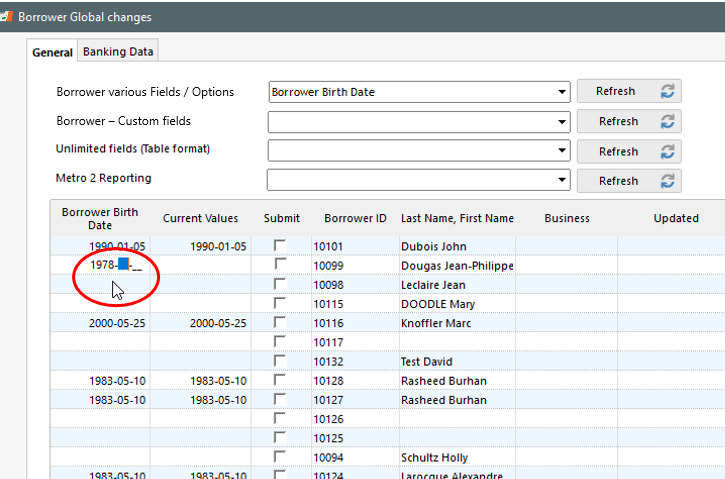
If the data is never the same, for example, adding the date of birth for Borrowers, you can add the data line by line.

Once the data is entered or changed, press on Save (bottom right). The changes will be made.

Adding data via spreadsheet (Sorry not yet… but coming soon):

  • In version 5.0.x coming up in a few weeks, you will be able to make these Global changes with a spreadsheet (Excel). All you will need are two columns (a loan Identifier – our “MLM Record ID” or one of the two “Unique Identifiers”. “File”, “File Number” and “Accounting ID” are not allowed since these may not be unique identifiers). It is strongly recommended to start using the Unique Identifiers offering much more versatility.

This is not the same as adding a new loan or Borrower in the database – this can be done through Tools, Settings, Special and:

See http://www.margill.com/en/mass-importing-existing-loans-and-borrowers-in-margill-loan-manager/


You can also use the Global changes for these practical changes:

  • Change Active Records to Closed after your fiscal year end
  • Activate Automatic fees
  • Enable or disable the sending of email reminders to your Borrowers
  • Activate the Electronic Funds Transfer for a bunch of Records at once
  • Add banking data to your Borrowers
  • Make corrections in bulk
  • Add Metro 2 credit reporting compulsory data to the loans and Borrowers
  • Update and change most Borrower data and their Custom fields


Mass importing existing loans and borrowers in Margill Loan Manager

Q: I wish to change from my current loan servicing platform to Margill Loan Manager. Can I import my existing loans or will I have to enter these one by one?

A: Mass import can be done easily with simple spreadsheets (Excel).

You can import:

  • Borrower data
  • Creditor data
  • Employer data
  • Basic loan information (loan type, loan amount, interest rates, dates, amortization, method, custom fields, etc.)
  • Individual historical payments (paid, partial and late payments, additional advances, etc.)

Go to Tools > Settings > Special section >

Your Excel sheet must list all the data column by column. This is a sample spreadsheet for importing loan information.

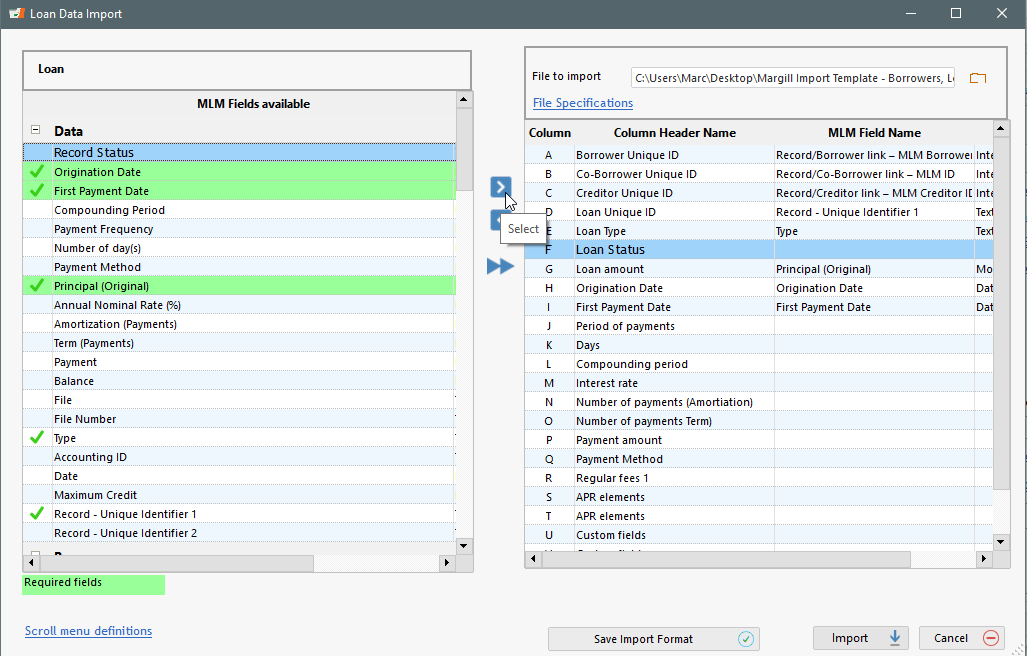
Select the spreadsheet and then map the spreadsheet columns to the proper Margill fields:

You could have one single spreadsheet with Loan and Borrower information and map some columns but not others depending on where the data fits (Loan or Borrower).

You can save this format to use over and over to add more loans and Borrowers in bulk.

Please contact Margill Support to obtain a sample sheet with more import information…


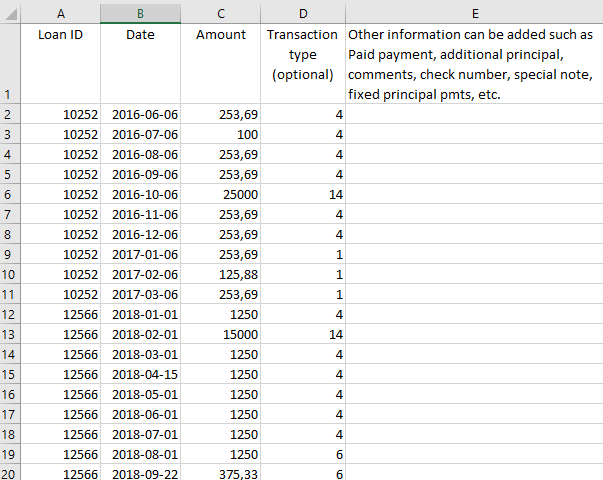
You can also import individual transactions with an Excel sheet:


The Transaction type columns uses a number to identify the transaction type: payment, advance, etc. Comments and a host of other data can also be added such as Check number…


Importing loans and Borrowers takes no time at all. The challenge lies in getting the proper information from your existing system into the Excel sheet. The Margill team is there to help in this transition.

See also how to add data in bulk once the loan or Borrower is entered in the database: https://www.margill.com/en/mass-data-entry-global-database-changes-adding-new-data-in-the-database-in-bulk-mass-database-changes-in-margill-loan-manager/

PS: Good idea switching from your other system to Margill 😉

Setting up automatic emails (reminders) to your borrowers

Margill Automatic Emails…

  • Allow you to have Margill send out emails automatically a few days before a payment is due, to remind your borrower to pay.
  • You can send reminders to all your borrowers or only the ones that don’t pay so well or on time…
  • The system can automatically email your borrower that a payment was returned NSF
  • The system can automatically email your borrower that the last payment of the loan is coming up and that the renewal date is close
  • Or emails can be sent based on any other “Line statuses” that you have set up

Total Flexibility in your Payment Schedules

Loan servicing made easy

Completely adapt a payment schedule to your borrower’s needs and real life such as irregular payments, seasonal cashflow, interest-only, principal-only, partial, late, unpaid payments, lump sum, automatic fees, negative balances in intercompany loans, interest rate changes, residual value…


Can we email an amortization report to each borrower when interest rates change?

Margill Loan Manager – Can we email an amortization report to each borrower when interest rates change?

Yes this can be done.

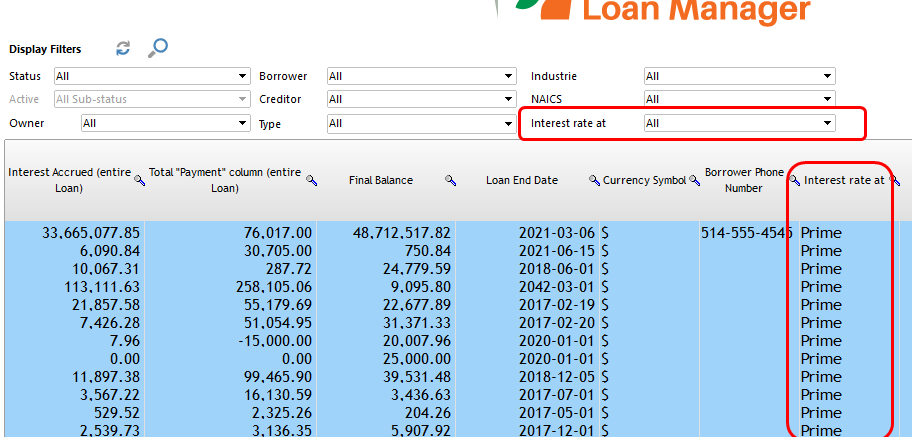
First, I guess you updated the interest rates though the Main window with Ctrl Alt Shift i. Ideally you have a custom field that identifies the loans that are tied to the specific index (Prime, LIBOR, etc.). With this field you can easily select the proper loans to 1) change the interest rates quickly and 2) send the amortization schedule by email.

You could have the scroll menu with “Prime” or to be more precise “Prime +”

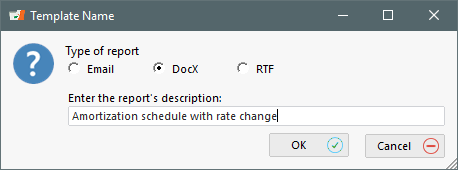
To create the statement to send out, go to Reports > Mail/Email Template > New and create a DocX that offers many more options than the older RTF.

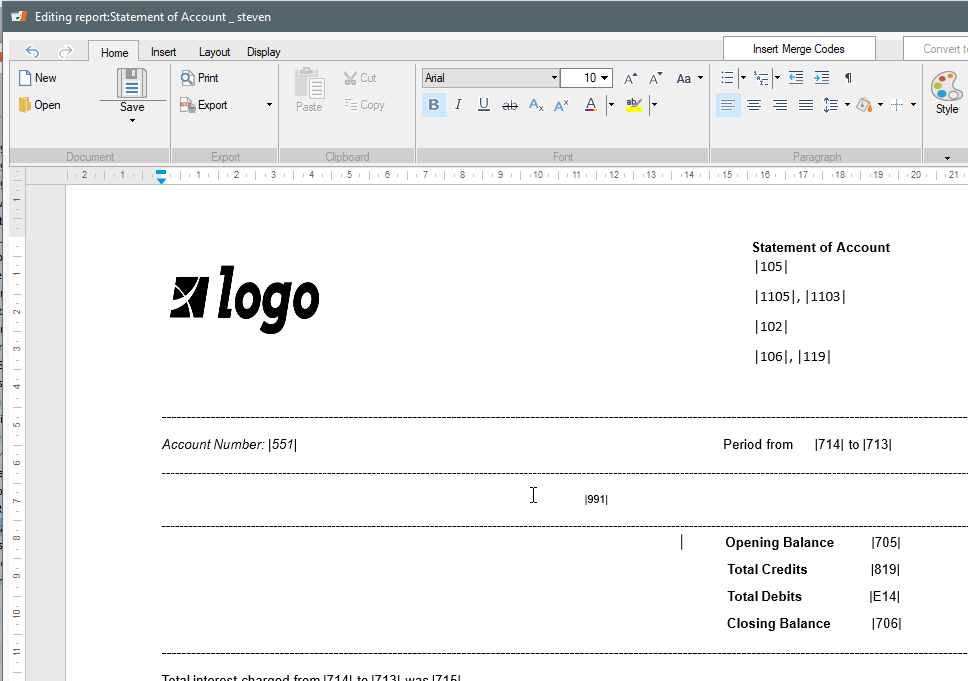
You can then structure the template and enter your logo and add the Merge codes to identify the Borrower, etc. You could also create your statement in Word and copy it here afterwards.

Here is what this could look like (the |105| for example, are Merge fields)…

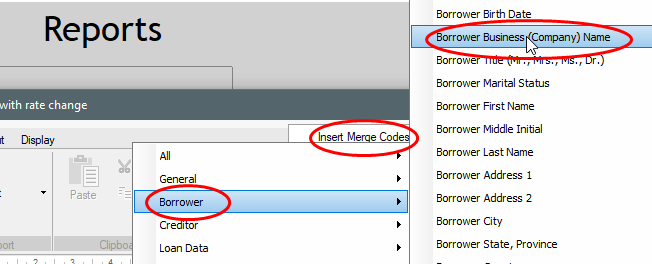
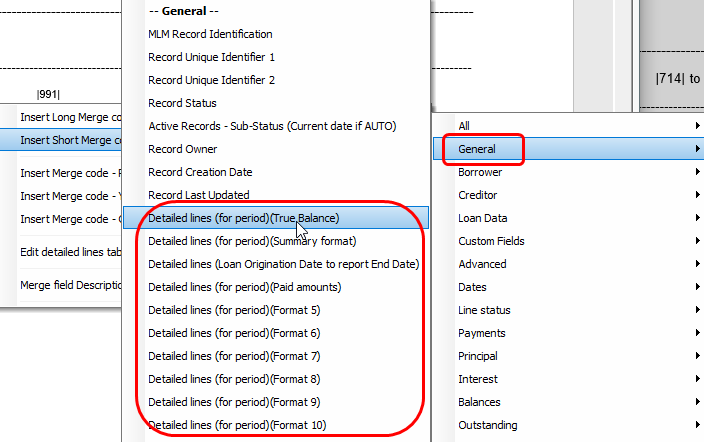
The merge codes to enter the amortization schedule per se are under the General theme. You can try each to see which is best for you. There are 10 templates and we can program others to meet you exact needs (columns included, titles, etc.).


Now that your template is created, test to see if all is good (numbers, names, etc.).

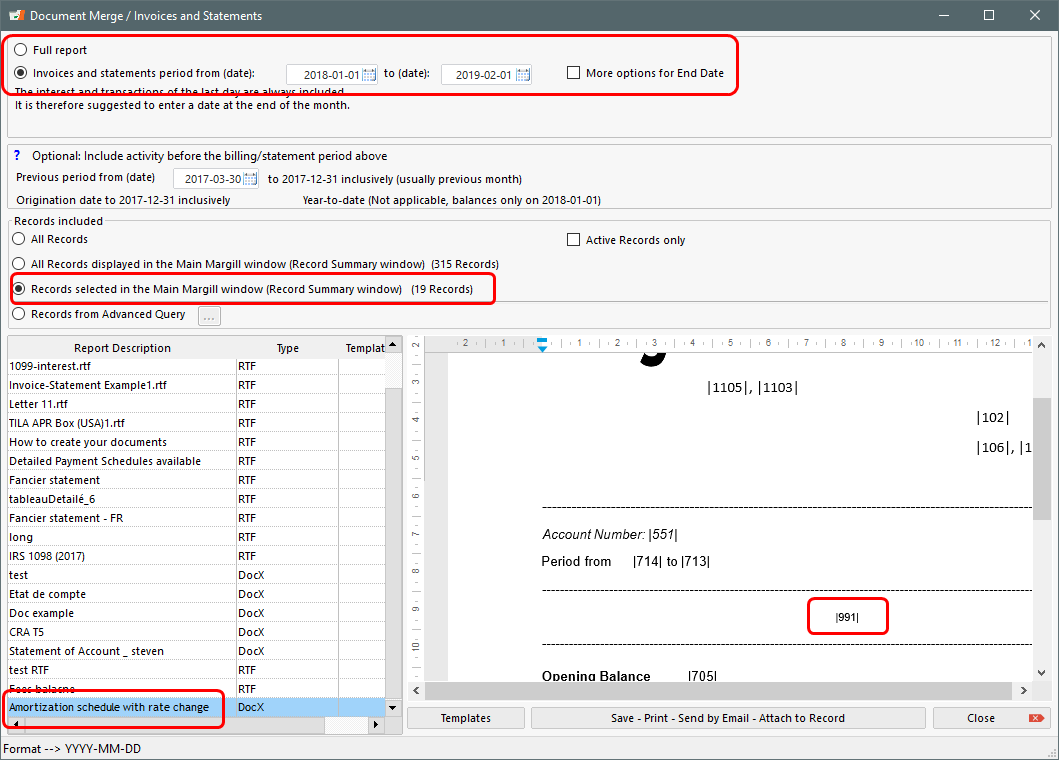
Go to Reports > Document Merge.

You will need to select a date range or show the entire schedule (past, present and future payments). I would opt for a date range to see up to the rate change, not the future.

See the circled red settings below. |991| will be the schedule…

Then press on “Save – Print -Send by Email”.

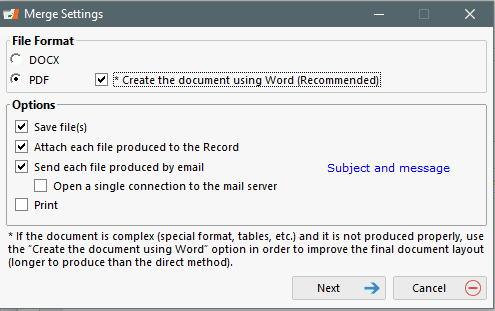
Here are the options:

You can also add an email  Subject and Message when sending the email.

Email sending must be configured in Tools > Settings > Email Connection. Your IT person will usually set this up properly for each Margill user.

The selected Records will all be sent out by email in a batch. Each takes about 10 seconds to create and send out.

Margill Loan Manager: Is there an audit trail that can be printed to show transactions / changes to records on a daily basis?

Q: Is there an audit trail that can be printed to show transactions / changes to records on a daily basis?

A: Yes very easily.

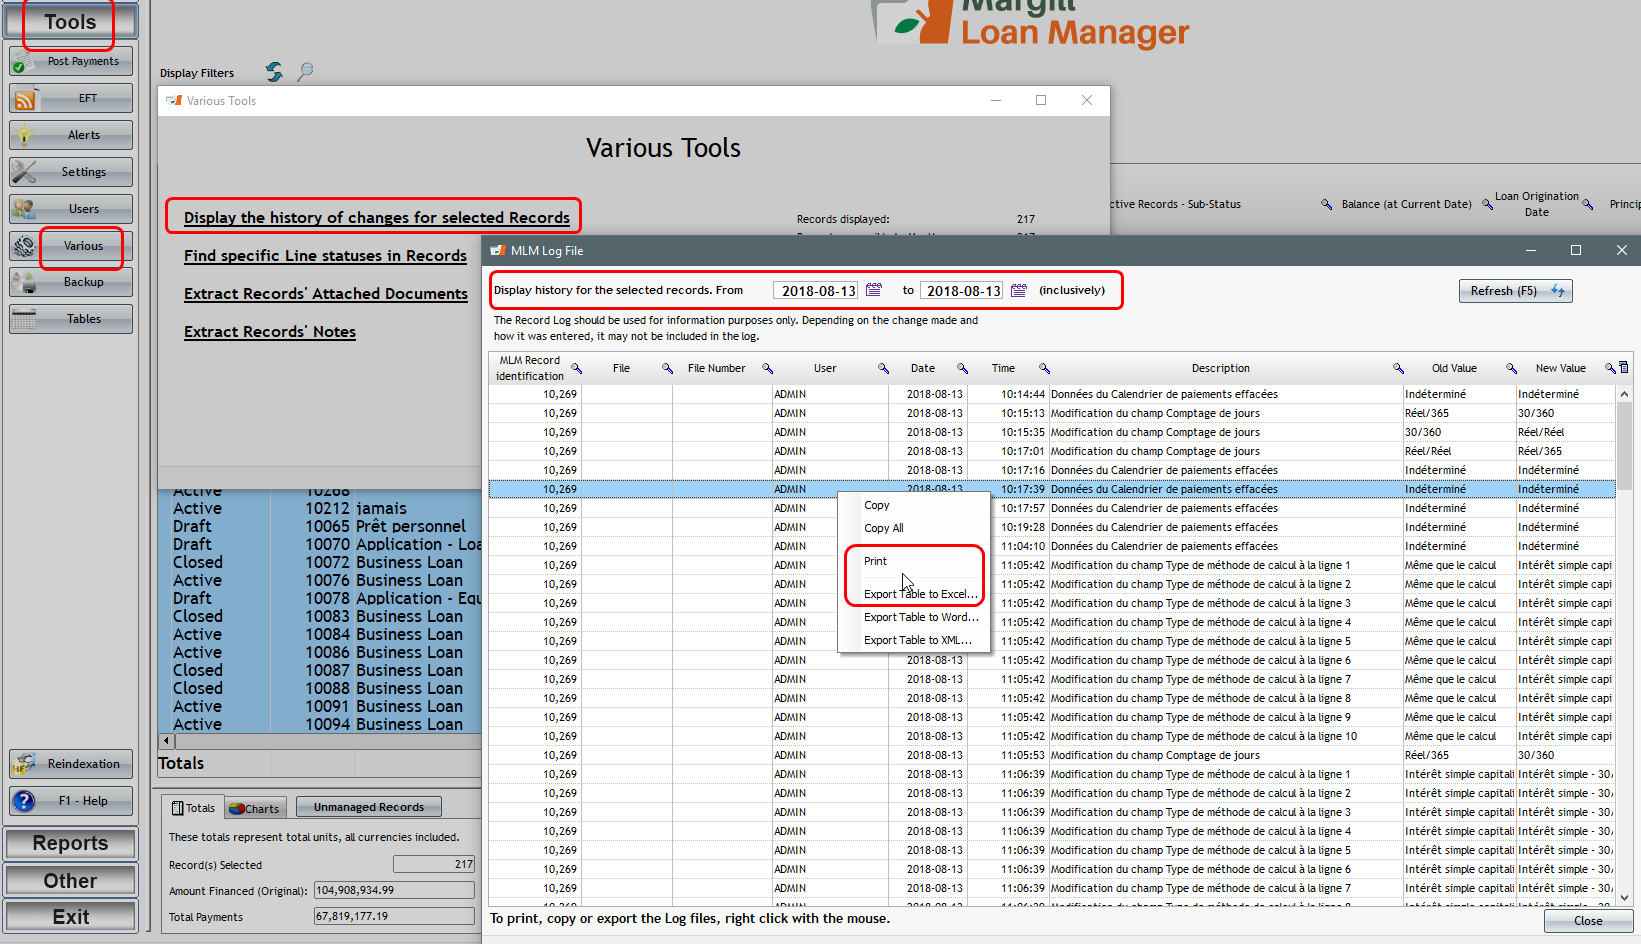
Go to the Main Margill window, select all the loans (probably only Active loans) , Tools > Various > Display the history of changes for selected Records.

You can then right click with the mouse to see the changes for the day, yesterday or any period of time.

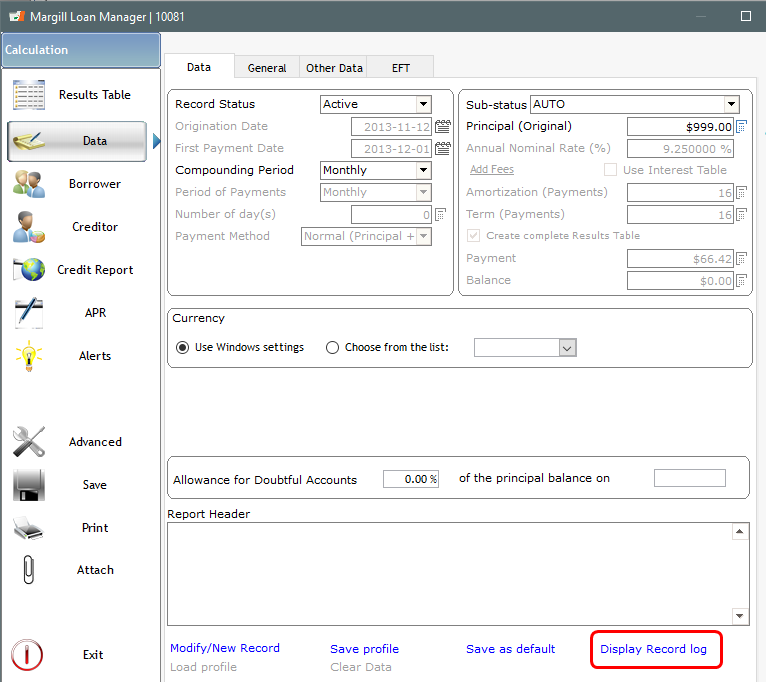
You can also see the log of changes loan by loan in the Data window of each loan:

Can Margill Loan Manager be used to manage rentals (rent)?

Question: Our company does loans and rentals. Can Margill Loan Manager be used to manage rentals (monthly rents)?

Answer: As strange as this may sound for a loan servicing software, yes Margill Loan Manager can manage rentals.

The difference between a loan and a rental is that loans begin with a principal amount borrowed that usually will decrease as payments are made for the interest and principal portions. Rent on the other hand, is due (accrued), and payable every month. So rent accrues usually on the first of the month and then is paid, hopefully, on the same day. Usually, interest is not charged on rent.

First, in Tools > Settings > Custom Column Titles, change the Column “Fees” title to “Rent”.

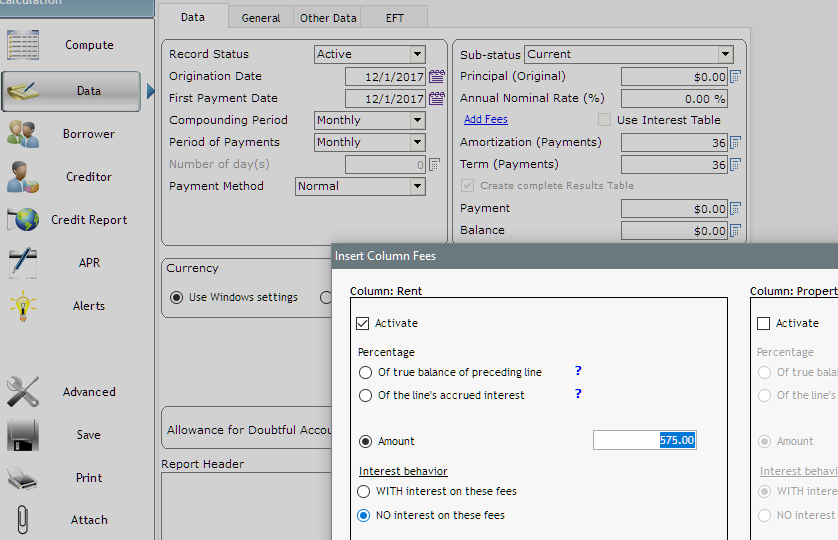
Create a new Record. Under Data enter the date at which the first rent is due. The same date should be entered in both Origination Date and First Payment Date. The rents are payable monthly. Principal (Original) should be 0.00 and since there is no interest on the rent, Annual Nominal Rate (%) should also be 0.00%. This is a three year rental for 575 per month. Press on “Add Fees” and a window will allow you to enter the monthly rent amount.

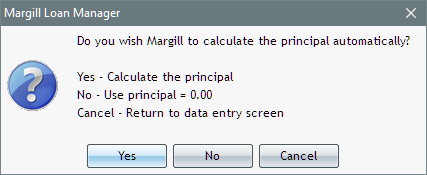
Then press on Compute and answer No to this pop-up. We do not want Margill to compute the Principal (remains 0.00).

The rental payment schedule then appears. I moved my column called “Rent – Accrued” to the left to see it readily without needing to scroll to the right. The rent is “charged” with the “Rent – Accrued” and paid with the “Payment” column.

Notice on line 3 that my rent is a few days late. This does not change anything mathematically since interest is not charged, but this allows you to balance with your banking transactions. A partial rent amount could also have been entered and the schedule then changed based on what was agreed for later repayment between the “landlord” (or equipment rental) and the person who rents.

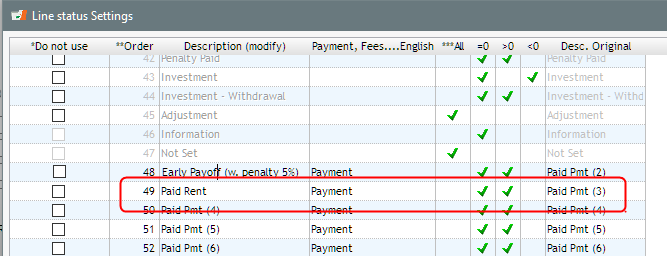
To be fancy, I renamed a Paid Pmt (x) Line status to “Paid Rent”. Go to Tools > Settings > Line status.